| |
Creating a Single Channel Sequence |
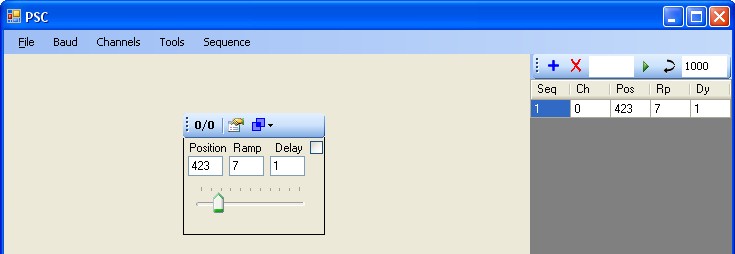
Creating a sequence of servo position is fairly easy. Simply slide a servo to the desired position then click the blue plus  button. You will see a new record is added to the position grid. Try to clicking the add button again, nothing happens. This is by design, only channel controls that have changed since the last add instruction are copied to the grid. button. You will see a new record is added to the position grid. Try to clicking the add button again, nothing happens. This is by design, only channel controls that have changed since the last add instruction are copied to the grid. |
 |
| |
Grid Toolbar Icons |
|
Adds a position to the grid view |
 |
Removes a position from the grid view. To remove a record, type the record number in the sequence textbox  then click the then click the |
 |
Run if the sequence text box is blank , clicking run will execute all the position commands in the grid view from top to bottom. |
 |
Updates a record. Enter the record to update in the sequence textbox then click the update button |
|
Run a sequence of records. Example enter 1-5 to run records 1,2,3,4, and 5. Enter 1,9,2,3-5,4-10,1,2 to execute records 1,9,2,3,4,5,4,5,6,7,8,9,10,1,2 in that order. |
 |
Group delay. This is the amount of time in milliseconds that the systems pauses after executing a record or a group move. The default is 1 second. This gives the servos time to finish their movement. |
|
Add a few more positions to the grid, then click the run button . Each position command is highlighted as the postion command is execute. The channel control(s) also reflect the position of each servo as the sequence executes. The sequence ends once the all row have executed. To run in infinite loop mode click the sequence drop down and select "Repeat" then click the run button.
To stop execution, click
the run button one more time or uncheck "Repeat" in
the sequence drop down menu. |
| Next saving your project files >>> Coming Soon! |
| |
| |
| |
|